In recent times a number of helmet manufacturers have started developing technology which increases the usability of a bike helmet. One of these is the use of an intercom device which can be attached within helmet and can be used easily and effectively in a number of different ways in which to communicate with other devices or individuals. In this review we will take a look at the new Nexx Bluetooth device.
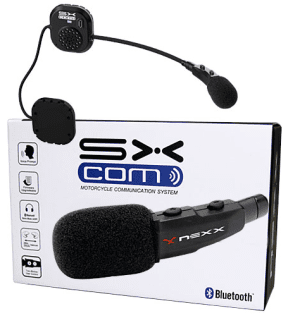 If you are after a high-quality bluetooth intercom then I suggest you take a good look at the Nexx X-Com. This has been designed to fit in with the Nexx XT1 touring helmet and developed by the company Sena. The great thing about this is that you can be provided with a helmet for touring which comes with a Bluetooth intercom that is version 3.0 and is of the Nexx X-Com Bluetooth intercom. This means that you can easily connect to your smart phone via Bluetooth or to your riding friends.
This intercom device also allows you to carry out a conference which is up to Four-ways. One can also carry out a conference which is three-ways and this can be used with the participant on the intercom plus an individual who is using a phone. The design of the device is very slim, light-weight and the ability to operate for up to 900 meters. This means that it won’t affect the aerodynamics of the helmet design and will not interfere with your riding ability when you’re trying to use it.
Specifications of the Nexx X-Com
- Technology which is 3.0 Bluetooth is utilized
- Intercom Device has a range of up to 900 m or 980 yards
- Mobile phones can also be used with the Bluetooth device so as to be hands-free
- Comes with a stereo headset which is Bluetooth and can be used for audio MP3 players which are Bluetooth
- Can be used with GPS devices for navigation which use Bluetooth
- Four-way intercom for conferences
- Three-way phone call for conferences with a participant on intercom
- The ability to speed dial
- A built-in booster for audio
- The ability to use in wet weather conditions
- Sound is of a natural quality and is clear
- Can be charged whilst out and about on the road
- The Bluetooth function can be used with navigation on the GPS
- Can be used with mobile phones for multipoint pairing with Bluetooth
- Ultra slim design and light in weight
- Has firmware which can be upgraded
- Has a warranty for up to 2 years
- Has a selection of profiles which are supported such as a hands-free profile(HFP), headset profile, audio distribution profile(A2DP), and audio and video remote-control profile (AVRCP).
Installation Instructions for the Bluetooth Nexx X-Com
After analyzing the device we have carried out a set of tips for you when you decide to install the intercom yourself on the XT1 helmet. The first thing to do is be careful that you don’t damage your helmet and do this by placing it on a surface which is soft. This will mean the shell isn’t then damaged in any way when it is placed upside down. Removing the pads on the left side which is near the rear side of the helmet. You can find these emergency release pads and can then remove them by locating the poppers which secure the pads into place. Once you have located these you should be able to remove the chin pads by sliding them downward away from the poppers. We suggest that you remove both the poppers and the keypad so that it is easier to replace.
The next step is to unclip the housing cover on the intercom which is on the Nexx X-Com.
Find the small recess in the inner part of the helmet by flipping the helmet upside down. This will be where the feed from the Nexx X-Com will go through.
Begin to feed the cable from the intercom through the small space in the helmet.
Once this is done you can click the Nexx X-Com into the recess of the helmet
To access the recess of the Nexx X-Com find it at the rear end of the helmet. To access them you can unclip the lining which holds the rear of the helmet in place
Take the X-Com electronic cable and connected to the recess of the XT1
Connect the battery to the electronic hub after the battery has been charged
Take the microphone and connect it to the electronic hub
Connect the earphones in to the hub
Place the battery and the hub in the rear of the XT1 in the recesses. Then click the linings back into place which can be found on the inner part of the helmet
Install the earphones
Replace the keypads and fit them in with the poppers and clips which can be found at the base of the helmet.
Place the microphone which can be found at the front of the helmet into the recess area
Once you have done this simply follow the guides which are provided in the manual that comes with the device, so that you can connect your Bluetooth device to other digital devices and start using it effectively to communicate with others.